This provides some information about my observatory. It’s a roll-off-roof shed, constructed to house my 12″ LX200 and computers. This page explains it’s construction and some do’s and dont’s of observatory construction. Intended to be of use to others who attempt to build an observatory of their own.
Arriving at the point where as an amateur astronomer you have your own observatory is no small feat. For me it took many years of iterative improvements, learning curves, equipment changes, mistakes, and slowly building upon existing resources and funds.
")


Construction on the observatory was finished in December 2001 and since then I’ve been able to use the 12″ on a regular basis more frequently. Using the 12″ without the observatory required two people for setup and the effort of carrying it all out and setting it up which lead to me only having a chance to use it once a month or less.
Since December 2001 I’ve been making gradual improvements to the observatory & telescope setup as I can afford it and as I get time. The current observatory and equipment you see in the pictures here have taken many years of time and effort to accumulate.
- 2001 – Completion
- 2003 – Wedge fitted to 12″ LX200
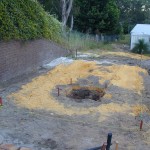
- 2005 – Observatory re-located to new property
- 2006 – Inside half lined with insulation and cladding
- 2008 – Red glo-wire fitted to open half for improved safety of visitors
- 2011 – Paramount ME replaced forks of LX200 for improved automation.
- 2012 – upgrade from SBIG ST7-XME to ST8-XME
- 2013 – AAG CloudWatcher and motorisation of roof for improved automation.
- 2014 – Motorisation of Megrez90 focuser with SharpSky Pro.
- 2015 – Insulation of open half roof to prevent condensation in winter.
The observatory is made of a simple metal structure with colourbond metal sheeting for walls and roof. The inside is now insulated using 40mm insulation with fibro-cement cladding which is painted.
Disadvantages of a metal roll-off-roof observatory
At first the biggest issue was heat. In the Australian summer heat (35 – 40 degrees C in Perth) the inside of the shed could get quite hot (50 degrees easily). To help with this I’ve picked a light colour (wheat) for the colourbond. I then painted the roof white and installed a ventilation fan that I turn on for hot days. With the roof painted white the temperature inside dropped increadibly to only a couple of degrees above outside temperature. I am still considering insulating and fully sealing the enclosed half of the observatory, as much for comfort in winter as anything, but this would reduce the ability to dismantle the observatory and move it in the future.
The second issue with the observatory’s design (after heat) is dust. With the rolling section and corrigated nature of the colour bond sheeting comes many gaps that air can flow through. It is an ongoing background task to slowly plug gaps and invent ways of preventing dust coming in to the observatory. In the mean time I always ensure lenses are protected and important pieces of equipment not permenantly attached be stored in sealed cabinets where dust does not penetrate. The biggest anoyance of dust is the general cleanlyness of the desks and computer keyboard, mouse and moues mat.
Advantages of this design of observatory
The tin construction of the observatory has huge advantages. The two that come to mind immediately are heat conduction and first impressions.
Advatage 1, cooldown time: The tin conducts heat out as well as it conducts it in, as soon as the sun leaves the observatory it rapidly (within 10 – 20 minutes) cools to equal or less outside ambient temperature. It is quite common to walk in to the closed observatory after a hot day, after dark and it be noticably cooler inside than outside.
Advantage 2, camoflage: It may sound stupid at first, but when you think about it, a white dome in the back of your yard is a sure sign there’s something expensive inside, and that the house probably has something expensive in it too, possibly worth stealing. The tin shed looks like a normal garden shed, not even a big one at that. I feel confident in the security of the observatory partially just because of that one simple factor. Of course it has many locks also, but if a theif is determined they will break in through any locks – unless they don’t realise it’s there.
The Pier
The telescope is mounted on top of a 90cm pier which is made from 10mm steel plate and an 8″, 10mm steel tube. The pier is made of three sections. The bottom section is below ground inside a cubic metre of concrete. The cube of concrete is 1m by 1m by 1m deep. The bottom section of the pier has a flange at ground level which the second section is bolted onto with bolts. The middle section is the main 90cm section of steel pipe. O top of the main section is two steel plates. These plates a joined by 3/4″ threaded rod. This allows the top plate to be leveled accurately by adjusting the position of the nuts on the threaded rods.
Location and portability
The observatory is currently within the metropolitan area of Perth, Western Australia. I built it with the intention of moving it into the country. Already it has been moved once, from it’s original place of creation where it was used for 4 years, to my new residence in late 2005. In the future I wonder if it might be moved further out in to the country, preferably a 2 hour drive south-east of the city, but yet to be determined. The whole observatory can be unbolted from the concrete slab and relocated, leaving only the concrete and bottom section of the pier inside the concrete block (that thing isn’t moving anywhere). At the new location I have new concrete laid with a new bottom section of the pier put in place.
Do’s and Do Not’s of Observatory Building.
Having now built an observatory I can see how things could have been done better. So I’ve put a list here of what improvements I would make if doing it all again, and do’s and don’ts of building an observatory. I’m only mentioning a few items which I found myself, and that weren’t mentioned in the usual observatory building resources on the web. So this is a list in addition to the other “usual” do’s and don’ts available on the Internet (www.mapug.com is a good place to start for observatory tips.)
- The most important “Do” is to plan carefully and extensively exactly what you want in your observatory and how (& where) it is to be built. By this I mean rotation of the observatory (if it’s not a dome), position from trees, slope of floor, dimensions (square, rectangular, more room beside the telescope than other place, etc). There are many great resources on the web for researching observatory building and many other sites like mine telling of their building experiences.
- Don’t have a flat section of roof. Because of poor planning I didn’t have the concrete pad sloping in the correct direction, resulting in an almost flat section of roof sloping slightly into the centre of the shed. This causes water to pool in the winter. I’m still not sure how I would build the observatory without a flat section of roof, but I’d find some way.
- Install conduit in the concrete from wall to pier for electrical & data cables. I meant to do this but forgot to tell the concrete contractor, and wasn’t there at the time the concrete was poured.
- Plan carefully where you telescope will point most of the time, where it will be positioned when on a wedge and where it will be positioned when not on a wedge. Make sure it’s going to end up being in the centre of the open roof area giving maximum sky views.
- Prevent dew from forming inside the observatory, especially when not in use. I only discovered this during the first winter when I wasn’t using the telescope very much. I found that even with the shed completely closed dew was forming inside the observatory, causing rust, etc. There’s various methods that can be used to control this (light globe for heat, insulation, something other than tin as cladding, etc).
- Seal the observatory from dust. My observatory has plenty of gaps where dust can blow in during summer. I have to keep many thing inside the observatory covered when not in use, or just put up with the dust. This should be kept in mind when designing the observatory.
- Make sure the Pier is the correct height. My one isn’t too bad, but if anything it’d be nice a little lower as viewing through the Megrez mounted piggyback (or camera piggyback) requires an extra step. However it is often an advantage having the eyepiece of the LX200 quite high.
- Design the observatory to be comfortable for use by yourself, rather than purely as a technically perfect but inhospitable building. My observatory has a few attributes which aren’t favorable for observing conditions but do make observing much more enjoyable. Most notably is the 4 speaker sound system (which can introduce vibrations depending on volume level and base), carpet (which is not ideal for dust control), half of the roof remaining closed (less viewable area of the sky, but somewhere to shelter from the cold) and plenty of red lighting (means less having to hold a torch but worse dark eye adaption).
Observatory in Action
See the below time lapse video showing my observatory in action doing supernova searching and mapping runs.
Collecting Data (astrophotography) from Roger Groom on Vimeo.