One way I record astronomical occultations is using the drift-scan technieque. This page will outline how I use drift-scan.
To summarise my procedure for drift-scan occultation recording:
- I use OccultWatcher to identify a potential occultation and find it in astronomical software TheSky.
- I use CCDCommander and TheSky to build a script which will record the occultation. The script usually comprises of:
- Focus on a star nearby
- Photograph focus star (for reference later)
- Slew to the occultation location
- Photograph target star centered (for reference later)
- Photograph taget star at tracking start position (for reference later)
- Wait until start desired start time (~40 seconds before expected occultation midpoint)
- Stop telescope tracking
- Take occultation image
- Repeat drift image from start position (for reference later)
- Start telescope tracking
- I use CCDSoft, a plugin I made for CCDSoft and Microsoft Excel to extract the drift line of the target from the captured image and graph the brightness of that line.
I will work through the above overview in more detail below.
Step 1: Find and identify occultation target and time
Using Occult Watcher by Hristo Pavlov I see what occultations are upcoming. Right-clicking on them I am able to see extra event details. From all of this I can see the event duration and location.
By right-clicking on the event, using my TheSky6 or TheSkyX Occult Watcher plugin I can centre TheSky (by Software Bisque) on the target location.

Once centered in TheSky, I use Ctrl-left-click to add a user defined point for the occultation. This user defined point can be used for centering/automation later.
With my Field of View indicators configured in TheSky I add a second user defined point at the start-drift point (to the west of the target, slightly inside the exposure). This user defined point will be the actual point the telescope slews to for the drift-scan.

2. Recording the Occultation
I use CCDCommander for the automation of my observatory. This piece of inexpensive software uses other programs on you computer such as TheSky, CCDSoft and FocusMax to control your equipment. CCDCommander allows you to build a script of tasks to run.
In CCDCommander I build an occultation script which often looks similar to the following:

The above script in CCDCommander is quite readable and so probably self explanatory. A few notes are:
- I have written an external program “RASCOMCoding.exe” which uses the available TheSky library to command the telescope to stop and start tracking at sidereal rate. You can download VB Scripts which will stop and start tracking of the telescope here.
- I have written an external program “SleepTimer.exe” which waits for the specified amount of time. This has two parameters, one is an offset which is overheads such as the amount of time it takes the program to start and stop, and a second parameter for the number of seconds it should wait. I have the two distinct parameters so I don’t need to remember the offset, I always leave it the same (given other variables such as PC speed has not changed) and simply configure the seconds to wait as is required for the actual occultation.
- Only one exposure is required for drift-scan, but to help with identifying the target star in the drifted image I take several exposures prior to the drift image. This helps with diagnosis later. As a precaution I take exposures of the focus star, the FOV of the occultation centred on the target and the FOV of the occultation centred on the drift-start location. These all help later to understand focus accuracy, pointing accuracy and FOV identification.
- The above script shows two focus commands. This is only because at the time of the occultation I was having issues with focus accuracy, and to handle the possibility of intermittent cloud preventing a successful focus upon first attempt.
The above script is usually included as a sub-action list within a larger CCDCommander script for the night’s observing.
My equipment comprises of a Software Bisque Paramount ME (PME) with 12″ LX200 OTA atop. Using the PME I can realiably centre an object very accurately (within a few arc seconds is usually OK). If you have a less accurate mount you would need to cater for greater tolerances than I do.
3. Processing Drift-scan Occultation Results
The final step with drift-scan observations of occultations is to process the results. I do this using CCDSoft and Microsoft Excel.
Initially you have a full CCD image such as the following:

The first step is to rotate the image so that the drift is close to horizontal then crop the .FIT image down to the single line of the occultation:

I have written a little plugin for CCDSoft which takes an image and for every column of pixels outputs to a text file (CSV) one of the following based on user configuration:
- The brightess pixel value for that column
- The average of all pixel values for that column
- The average of the brightest pixel value and the two pixels either side of that pixel for that column
The user chooses their method and the destination CSV file:

I am not yet sure which of the above algorithms for detecting star brightness is the best to use. I suspect it would depend upon the pixel scale of your setup, viewing conditions and noise. For example if you have a pixel scale of 0.5 arc seconds per pixel I would suggest averaging at least 4 pixels (2 arc seconds) hence using the first option. If you operate at 2.5 arc seconds per pixel choosing a single maximum pixel value might be appropriate. Also, if the star field is cluttered and so there are other star trails immediately adjacent to the target star, so you can not effectively crop them out, you should only choose one of “average 3 neighbour pixels” or “Choose single maximum” as you do not want other star trails affecting your data results.
If you would like a copy of the above CCDSoft Occultation plugin I have written, please contact me. (see the contact form on my site).
In the above example you can see that the target star overlaps a subsequent star. This makes drift scan a bit more tricky. In this case I know the brightness of the second star because it continues to drift beyond the first and so in Excel can subtract the brightness of the unwanted star from the target star. This is approximate and ideally you would avoid this kid of overlap by adjusting the length of the drift (your exposure time). Also remember that you care most about the part of the trail where the occultation actually occurred. In this case the occultation, including error bar, was scheduled to occur before the overlap would occur. In the above example no occultation was able to be observed above the general fluctuation in star brightness (noise). Viewing conditions on the night were very poor due to recent wet weather.
I have read that MaximDL provides a way to do what my CCDSoft occultation plugin does (convert a line of pixels to values in a CSV file).
The result from the above is a CSV file which you can graph in Excel and apply further statistical modelling to.
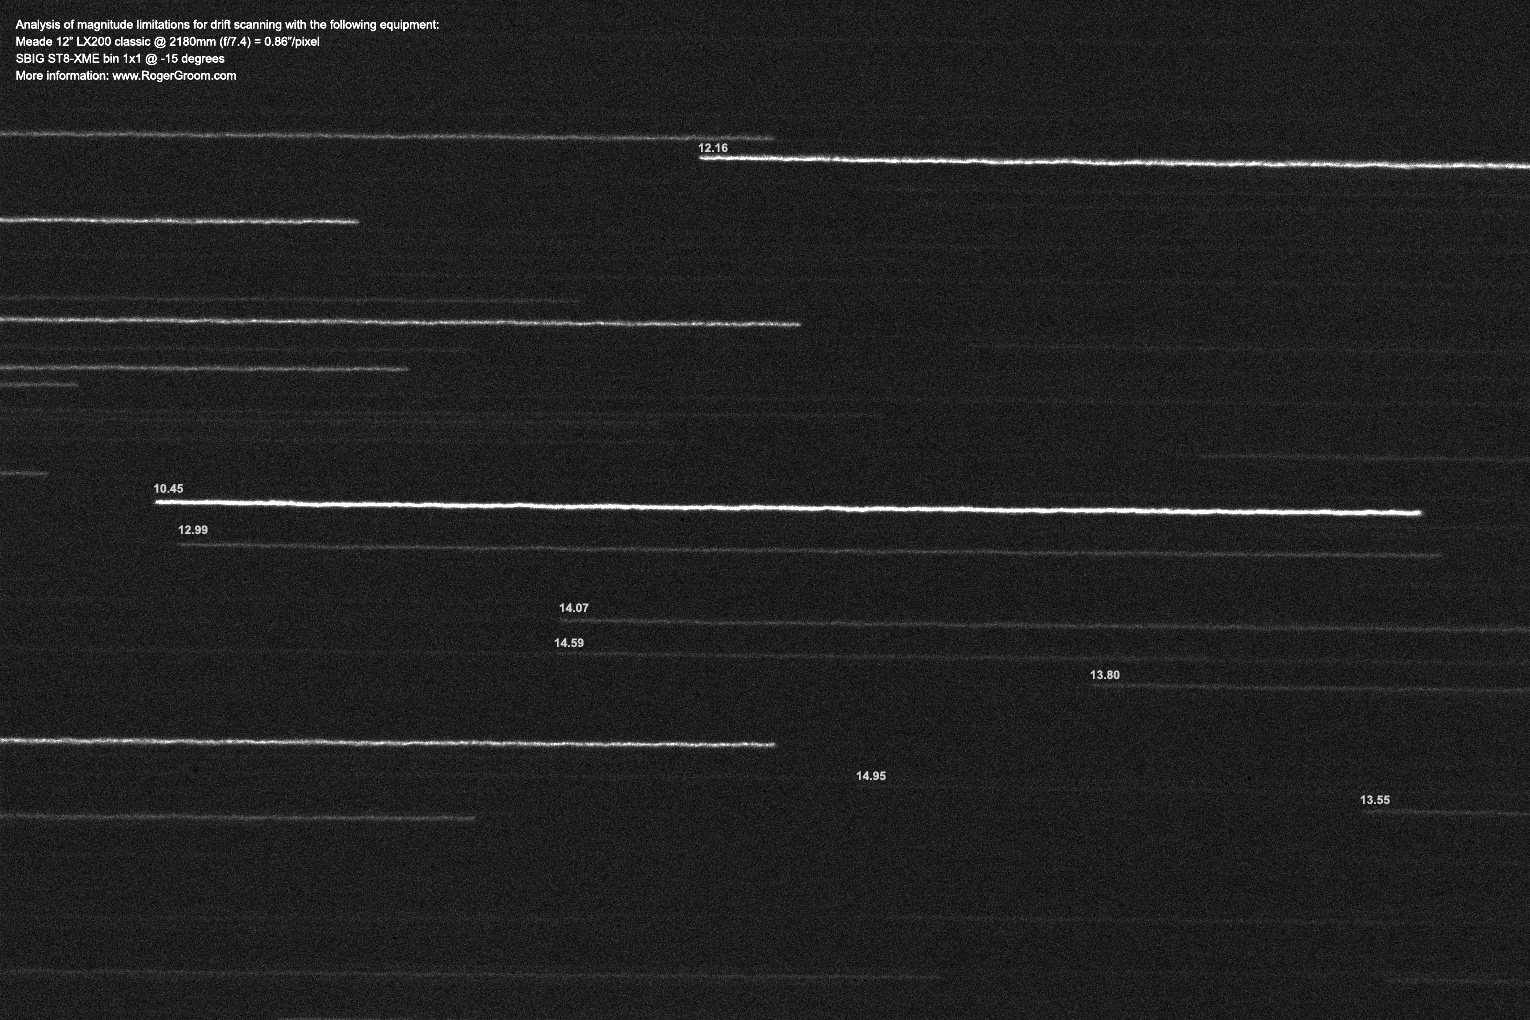
On my current set up (focal length of approximately 2180mm) a 80 second drift image will trace a star over 1265 pixels, with stars trailing at the pixel scale of the camera configuration which is 0.86″ per pixel (stars will drift 0.86 of a pixel every second). The balance between focal lengths is interesting. You would want a shorter focal length and faster focal ratio to detect fainter stars in a drift-scan, but at the same time you want a longer focal length to make the star drift faster across the image and hence give you greater granulation. My philosophy is to use what I have, and with my ST8 my configuration is best at 2180mm so this is what I use. If only doing occultations I might instead record them at f/10.
My current configuration can record stars using drift scan down to about magnitude 15. As you can see in the below image the stars visible tail off at about magnitude 14.95: